Most takeout teriyaki chicken is fine. It shows up in a plastic container, the sauce has cooled into something slightly congealed, and the rice is either undercooked or mushy. You eat it because it’s convenient, not because it’s genuinely good.
This homemade teriyaki chicken bowl is better. Not marginally better — noticeably better. The sauce is sticky, glossy, and built from four ingredients you probably already have. The chicken gets a proper sear in a hot pan so the edges caramelize. The rice is fresh. And the whole thing is ready in 20 minutes — faster than delivery would arrive.
Once you make this once, takeout teriyaki stops making sense.
Why This Teriyaki Chicken Bowl Works

There are many teriyaki chicken bowl recipes online. Most of them are fine. This one earns a permanent spot in the weekly rotation for a few specific reasons.
The sauce is built for caramelization. Soy sauce, brown sugar, fresh garlic, fresh ginger, and a splash of rice vinegar — that’s it. Brown sugar rather than white gives the sauce a deeper color and a slightly more complex sweetness that coats the chicken beautifully without being cloying.
Chicken thighs over chicken breasts. Thighs stay juicy under high heat in a way that breasts simply don’t. If you’ve ever made teriyaki chicken that turned out dry and rubbery, the protein was probably the issue. Thighs are more forgiving, more flavorful, and — once seared properly — genuinely impressive. You can use breasts if you prefer, but reduce the cook time slightly and watch them carefully.
The sea matters. A hot pan with a small amount of oil creates caramelized edges on the chicken that a simmered or baked version can’t replicate. Don’t move the chicken for the first two minutes — let it build a crust before you flip it.
It’s genuinely meal prep-friendly. The components store separately and reheat well for three to four days. Which means you can make this once on Sunday and have teriyaki rice bowls for lunch through Wednesday without any extra effort.
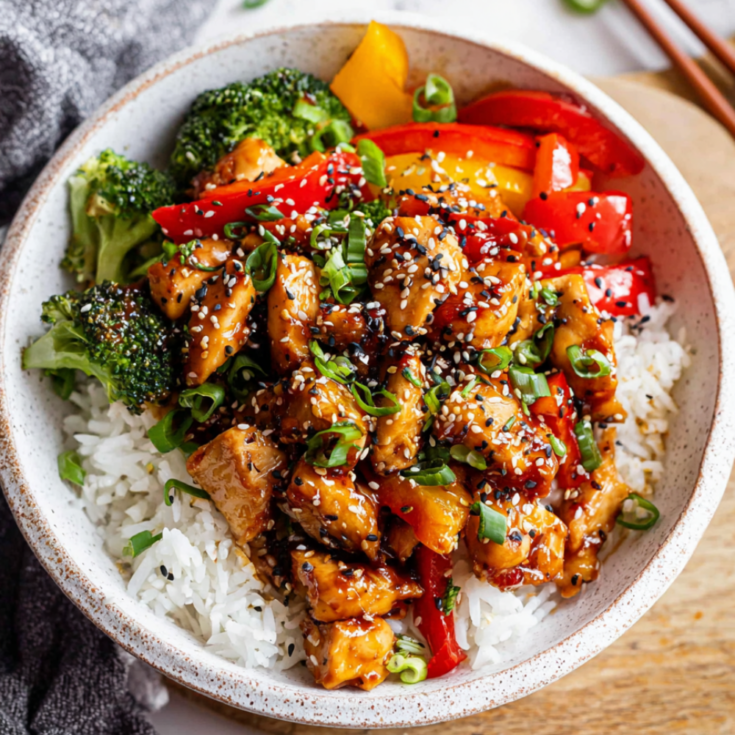
Teriyaki Chicken Bowl That Beats Any Takeout
Juicy seared chicken thighs glazed in a sticky homemade teriyaki sauce with soy sauce, brown sugar, fresh garlic and ginger, served over fluffy jasmine rice with steamed broccoli, edamame, shredded cabbage, avocado, and a drizzle of sesame oil. Every bite is bold, fresh, and genuinely satisfying
Ingredients
For the homemade teriyaki sauce:
- ¼ cup low-sodium soy sauce
- 3 tablespoons brown sugar — packed
- 2 cloves garlic, minced
- 1 teaspoon fresh ginger, grated — or ½ teaspoon ground ginger
- 1 tablespoon rice vinegar
- 1 teaspoon sesame oil
- 1 teaspoon cornstarch mixed with 1 tablespoon cold water — for thickening
For the chicken:
- 1½ lbs boneless skinless chicken thighs, cut into 1-inch pieces
- 1 tablespoon vegetable or avocado oil
- Salt and pepper to taste
For the bowl base:
- 2 cups dry jasmine or white rice, cooked according to package directions
- 2 cups broccoli florets, steamed or roasted
- 1 cup shredded red cabbage
- 1 cup edamame, shelled and warmed
- 1 medium carrot, julienned or shredded
- 1 avocado, sliced — add right before serving
Garnishes:
- 2 green onions, thinly sliced
- 1 tablespoon sesame seeds — toasted if possible
- Sriracha or chili oil for heat
- Extra teriyaki sauce drizzled on top.
Instructions
Step 1 — Make the Teriyaki Sauce
Whisk soy sauce, brown sugar, minced garlic, grated ginger, rice vinegar, and sesame oil together in a small bowl until the sugar dissolves completely. Set aside 2 tablespoons of the sauce for a finishing drizzle at the end — this gives the bowl a fresh burst of teriyaki flavor that the cooked sauce can't replicate. Mix the cornstarch with cold water in a separate small bowl until smooth. Keep this nearby — you'll add it at the end of cooking. Don't skip the cornstarch slurry. It's what transforms a thin marinade into a glossy sauce that clings to the chicken the way restaurant teriyaki does.
Step 2 — Sear the Chicken
Pat chicken pieces dry with paper towels — this is the step most people skip, and it makes a significant difference. Dry chicken sears. Wet chicken steams. You want the sear. Season lightly with salt and pepper. Heat oil in a large skillet over medium-high heat until shimmering. Add chicken pieces in a single layer — don't crowd the pan. If necessary, cook in two batches. Cook without moving for 2 to 3 minutes until a golden crust forms on the bottom. Flip and cook 2 to 3 more minutes until cooked through with no pink remaining. Internal temperature should reach 165°F. Two batches if needed. Crowding the pan drops the temperature, and the chicken steams instead of searing — you lose the caramelized edges that make this worth making.
Step 3 — Add the Sauce
Reduce the heat to medium. Pour the teriyaki sauce over the cooked chicken in the pan.
Stir to coat and cook 1 minute until the sauce begins to bubble and reduce slightly. Add the cornstarch slurry and stir immediately. Cook for 30 to 60 more seconds until the sauce thickens into a glossy glaze that coats every piece of chicken. Remove from heat. The sauce will continue to thicken as it cools.
Watch the sauce carefully once the cornstarch goes in — it thickens fast. Pull the pan off the heat the moment the sauce looks glossy and coats the pan.
Step 4 — Build the Bowl
Divide the cooked rice among four bowls — about 1 cup per bowl.
Arrange the teriyaki chicken over the rice. Add steamed broccoli, shredded red cabbage, edamame, julienned carrots, and sliced avocado around the chicken. Drizzle the reserved fresh teriyaki sauce over everything.
Finish with sliced green onions, toasted sesame seeds, and a drizzle of sriracha for heat. Serve immediately. Building the bowl with components in separate sections — rather than mixing everything together — keeps each ingredient at its best texture and makes the whole thing look significantly more impressive.
Nutrition Information:
Yield:
4Serving Size:
1Amount Per Serving: Calories: 774Total Fat: 30gSaturated Fat: 6gUnsaturated Fat: 23gCholesterol: 205mgSodium: 1231mgCarbohydrates: 74gFiber: 13gSugar: 16gProtein: 59g
Building the bowl with components in separate sections — rather than mixing everything together — keeps each ingredient at its best texture and makes the whole thing look significantly more impressive.
The Teriyaki Sauce — Everything You Need to Know
The sauce is the recipe. Get this right, and the rest takes care of itself.
The four non-negotiables:
Soy sauce is the savory base — use low-sodium so you can control the salt level. Brown sugar creates sweetness and the caramelization that makes teriyaki distinctive — don’t reduce it. Fresh garlic and fresh ginger add depth that powdered versions can’t replicate. If you’re in a rush, the powdered versions work, but fresh is noticeably better.
The two additions worth including:
Rice vinegar adds a subtle acidity that balances the sweetness without being detectable as vinegar. Sesame oil added off heat adds a nutty aromatic finish. Neither is strictly traditional, but both make the sauce taste more complex.
The thickening:
Cornstarch slurry — one teaspoon of cornstarch mixed with one tablespoon of cold water — creates the glossy, restaurant-style glaze. Add it at the end of cooking, stirring constantly. It thickens within 60 seconds.
Make extra. The sauce keeps in the fridge for two weeks in a sealed jar and works on salmon, tofu, noodles, stir-fried vegetables, and grain bowls all week.
Bowl Building Guide
The teriyaki chicken is the star — but the bowl components you choose to pair with it change the whole character of the meal.
Classic base: Jasmine rice is the traditional and most forgiving choice. Fluffy, slightly sticky, and neutral enough to let the teriyaki sauce shine. Cook it in chicken broth instead of water for extra flavor.
Lower-carb base: Cauliflower rice or a mix of half cauliflower and half jasmine rice works well and absorbs the sauce beautifully. Brown rice adds extra fiber and a slightly nuttier flavor.
Noodle base: Soba or rice noodles make this a teriyaki chicken noodle bowl that’s equally satisfying and significantly faster, since the noodles cook in under 5 minutes.
Variations Worth Trying
Teriyaki Chicken Bowl with Pineapple
Add ½ cup fresh or canned pineapple chunks to the pan in the last 2 minutes of cooking. The pineapple caramelizes slightly in the teriyaki sauce, and the sweet-savory combination is genuinely exceptional. This is the summer version of this bowl.
Teriyaki Chicken Bowl with Sweet Potato
Roast cubed sweet potato at 425°F for 20 minutes while you cook the chicken. Use as the base instead of or alongside rice. The natural sweetness of the potato pairs beautifully with the teriyaki glaze.
Crockpot Teriyaki Chicken Bowl
Place chicken thighs in the slow cooker, pour the sauce over the top, and cook on low for 6 to 8 hours or on high for 3 to 4 hours. Shred with two forks directly in the pot. Serve over rice with your choice of vegetables. This is the version for days when you want dinner completely handled before noon.
Turkey Teriyaki Bowl
Ground turkey works surprisingly well as the protein in a teriyaki bowl. Brown the chicken in a hot pan, breaking it into small pieces, then add the sauce and cook until glazed. Lighter than chicken thighs and genuinely satisfying over rice with shredded cabbage and edamame.
Teriyaki Chicken Poke Bowl
Slice the chicken thinner and serve over sushi rice with cucumber, edamame, avocado, shredded carrots, and a drizzle of spicy mayo alongside the teriyaki sauce. Closer to a poke bowl experience and equally good.
Meal Prep Guide
This teriyaki chicken bowl is one of the best meal prep recipes in the weekly rotation. Here is how to make it work for four to five days of lunches:
Cook the components separately. Store chicken, rice, and vegetables in separate containers. This keeps the rice from absorbing all the sauce and the vegetables from going soggy.
Store the sauce separately. Keep extra sauce in a small jar and drizzle over the bowl right before eating — the fresh sauce is noticeably better than pre-dressed rice that’s been sitting overnight.
Add fresh components the day of. Avocado, green onions, and sesame seeds all go on fresh. Everything else holds well for four days.
Reheat the rice properly. Add a splash of water to the rice before microwaving and cover with a damp paper towel. This keeps it from drying out and restores the texture to something close to freshly cooked.
Storage times:
- Teriyaki chicken — 4 days refrigerated
- Cooked rice — 4 days refrigerated
- Steamed vegetables — 3 days refrigerated
- Teriyaki sauce — 2 weeks refrigerated
Frequently Asked Questions
Can I use chicken breasts instead of thighs?
Yes. Breasts work well but require slightly more attention — they dry out faster than thighs under high heat. Reduce cook time to 2 minutes per side and check the internal temperature carefully. Pull them at 165°F and rest for 2 minutes before slicing.
How do I make the sauce thicker?
More cornstarch. Start with one teaspoon mixed with one tablespoon of cold water. If you want an even thicker glaze, add another half teaspoon of cornstarch slurry and cook 30 more seconds. The sauce also thickens as it cools.
Can I make this gluten-free?
Yes. Swap regular soy sauce for tamari or coconut aminos. Both work well — coconut aminos is slightly sweeter, so reduce the brown sugar by half a tablespoon.
What vegetables work best in a teriyaki chicken bowl?
Broccoli is classic and holds up well with teriyaki sauce. Edamame, shredded cabbage, snap peas, julienned carrots, cucumber, and corn all work beautifully. Avoid watery vegetables like zucchini directly in the bowl — they release water and dilute the sauce.
Can I marinate the chicken ahead?
Yes — and it makes the bowl taste better. Combine chicken with teriyaki sauce in a zip-lock bag or a covered bowl, then refrigerate for up to 24 hours. The longer it marinates, the more flavor penetrates the chicken.
How do I make this in a crockpot?
Add chicken thighs and sauce to the slow cooker. Cook on low for 6 to 8 hours or on high for 3 to 4 hours. Shred directly in the pot. Serve over fresh rice with vegetables. The crockpot version has a softer texture — less caramelized than the pan version but equally flavorful and genuinely convenient.
The Bottom Line
Takeout teriyaki is convenient. This is better.
A hot pan, four-ingredient sauce, chicken thighs that actually stay juicy, and a bowl built exactly the way you want it — in 20 minutes and for a fraction of what delivery costs. Once you make this the first time, the takeout version no longer makes much sense.
Make the sauce in double quantity the first time. Keep half in the fridge. Use it on salmon on Wednesday, stir-fried vegetables on Thursday, and start the whole cycle again next Sunday.
Save this recipe and make it this week — it earns a permanent spot in the dinner rotation.